Use Case
Are you wondering if you can install downlights in insulated roof panels for your cool room, warehouse, or home? It’s a common question for anyone looking to combine energy-efficient lighting with top-notch insulation. At Cool Room Master, we know how crucial it is to get this right—balancing safety, compliance, and performance. In this guide, you’ll discover whether it’s possible, the best practices for downlight installation, and expert tips to ensure your project shines. Let’s light up the details!
Understanding Insulated Roof Panels
What Are Insulated Roof Panels
Insulated roof panels are building materials made with layers designed to keep your space temperature stable. They usually have a core of insulating material like foam, sandwiched between metal or other protective layers. These panels are popular in commercial and residential buildings because they help keep heat in during winter and out during summer.
Benefits of Insulated Roof Panels
The biggest advantage of insulated roof panels is energy efficiency. They reduce heating and cooling costs by improving thermal insulation. They’re also lightweight, durable, and quick to install, which saves time and money on construction. Plus, they offer sound insulation and protection from weather elements.
Challenges with Modifications
While insulated roof panels are excellent for insulation, making modifications like installing downlights can be tricky. The insulated core is sensitive, and cutting into it without proper care can damage the panel’s integrity. This might lead to heat loss, condensation problems, or even safety risks. So, working with insulated roof panel lighting needs planning and the right approach to avoid these issues.
Can You Install Downlights in Insulated Roof Panels Short Answer and Key Considerations When It’s Feasible
Yes, you can install downlights in insulated roof panels, but it comes with important considerations. The main issues are maintaining the integrity of the insulation and meeting fire safety rules. Not every downlight works well with insulated panels because some get too hot or require empty spaces around them, which can reduce insulation effectiveness.
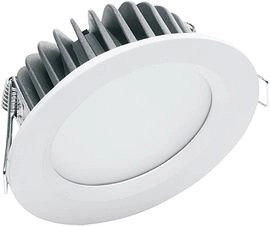
It’s feasible when you use the right type of downlights—usually fire-rated or IC-rated LED downlights designed for insulation contact. These lights don’t overheat and can be installed directly into or very close to insulated panels without creating fire risks or damage.
Before installing, make sure to check local building codes and consider the panel type. Some insulated panels are more sensitive, and cutting into them might affect structural or thermal performance. When done correctly with the proper fixtures, downlight installation can boost energy-efficient roof lighting without compromising insulation or safety.
Safety and Compliance for Downlight Installation
When installing downlights in insulated roof panels, safety and following the right rules is a must. Insulated panels are designed to keep heat in or out, so anything added to them needs to comply with fire safety standards and local building codes.
Fire Safety Standards
Downlights generate heat, which can be risky if they’re too close to insulation materials. To prevent fire hazards, you need fire-rated downlights or sealed fixtures specifically made for use with insulation. These lights are tested to withstand contact with insulation without causing overheating.
Building Codes and Regulations
Every state and city in the US has building codes around electrical work and insulation. Make sure to check local rules about the type of downlights allowed in insulated panels. Many areas require thermal insulation downlights that meet specific UL or ETL listings. Following these codes helps avoid safety risks and ensures your installation passes inspections.
Insulation Protection
Cutting into insulated roof panels can affect their performance. It’s important to keep the insulation barrier intact as much as possible and seal any gaps left after fitting the downlights. Using proper sealing methods keeps the energy efficiency of your roof while also maintaining moisture control.
By prioritizing fire safety, complying with building regulations, and protecting your insulation, you’ll have a safe, lasting downlight installation in your insulated roof panels.
Step-by-Step Guide to Installing Downlights in Insulated Roof Panels
Step 1 Assess Your Roof Panel Type
Before you start, check what kind of insulated roof panels you have. Different panels—like metal sandwich panels or foam core panels—handle modifications differently. Knowing your panel helps you pick the right downlights and installation method.
Step 2 Choose the Right Downlights
Pick downlights designed for insulated roof panel lighting. Look for fire-rated downlights or those labeled for use with insulation. LED downlights are a great choice—they run cool and use less energy, which helps protect your insulation.
Step 3 Plan the Installation
Map out where you want the downlights. Make sure they won’t interfere with structural elements or insulation. Follow local insulated panel building codes and safety guidelines to avoid problems later.
Step 4 Cut and Seal the Panels
Cut openings carefully—use the right tools to avoid damaging the panels. Once the holes are made, seal them properly to maintain the roof’s insulation and weatherproofing. This keeps the thermal insulation intact and prevents moisture issues.
Step 5 Wiring and Electrical Setup
Run wiring safely through the panels without compromising insulation or roof integrity. Use proper connectors and follow downlight installation safety standards. If you’re not confident, consider hiring a professional to avoid electrical hazards.
Step 6 Test and Finalize
After wiring and fitting the downlights, test them to ensure everything works right. Check for any gaps or weak seals around the fixtures. Finalize by cleaning up and securing all components so your insulated roof panel lighting is safe and efficient.
Common Mistakes to Avoid
When installing downlights in insulated roof panels, watch out for these common pitfalls:
-
Ignoring Fire Safety Requirements: Using non-fire-rated downlights can create a fire hazard. Always choose fire-rated or IC-rated fixtures designed for insulation contact.
-
Cutting Panels Without Proper Sealing: Cutting into insulated panels without sealing can damage insulation and lead to moisture problems or energy loss.
-
Using Wrong Downlight Types: Regular downlights can overheat or fail in insulated roofs. Use LED downlights made for insulated roof panel lighting to avoid heat buildup and power waste.
-
Poor Wiring Practices: Faulty or unsecured wiring can cause short circuits or electrical hazards. Follow local building codes and hire a pro if unsure.
-
Not Consulting Building Codes: Every state and locality can have specific insulated panel building codes. Skipping this step risks failing inspections or needing costly fixes later.
Steering clear of these mistakes helps keep your insulated roof panel lighting safe, efficient, and long-lasting.
Benefits of Professional Installation with Cool Room Master
Choosing professional installation for downlights in insulated roof panels has real advantages. At Cool Room Master, we focus on honest pricing, real quality, and better service to make sure your lighting setup is safe, efficient, and code compliant.
Here’s why going pro with Cool Room Master makes sense:
- Safety First – We know the right fire-rated downlights and how to install them without compromising your insulation or roof panel integrity, minimizing fire risk and energy loss.
- Code Compliance – Our team understands local building codes and insulation requirements, so your downlight installation meets all regulations without surprise issues.
- Precision Installation – We carefully plan, cut, seal, and wire your insulated roof panels to avoid damage and maintain thermal performance, preserving the panel’s insulation benefits.
- Energy Efficiency – We recommend and install energy-efficient LED downlights designed for insulated panels, saving you on electricity while keeping your space well lit.
- Long-Term Support – After installation, Cool Room Master provides advice and support to keep your lighting working perfectly through the years.
Trusting Cool Room Master means your insulated roof panel lighting is done right the first time — giving you peace of mind and a reliable, efficient finished product.
For more details on handling insulated roof panel modifications safely, check out our guide on how to run wires through EPS panels safely.
Alternatives to Downlights in Insulated Roof Panels
If downlights aren’t the best fit for your insulated roof panels, there are other lighting options to consider that work well with insulation and meet safety rules.
-
Surface-Mounted LED Fixtures
These sit on the panel surface without cutting into insulation. They’re easy to install, energy-efficient, and avoid compromising your thermal barrier. -
Strip or Tape Lighting
Flexible LED strips can be placed along beams or edges, providing good light without needing major panel modifications. They’re great for accent or task lighting. -
External or Wall-Mounted Lights
Instead of putting lights in the roof, mounting fixtures on walls or ceilings adjacent to insulated panels keeps insulation intact and simplifies wiring. -
Recessed Battens or Bulkhead Lights
If you still want some flush-mounted style, battens or bulkhead lights can be a good option. They require less dramatic cuts and are often sealed to protect insulation. -
Light Tubes or Skylights
Natural light alternatives like light tubes can bring sunlight in without affecting insulation. This reduces electric load and keeps your roof panel intact.
Choosing the right lighting depends on your space, usage, and code requirements. If you’re unsure, professional advice is a smart move to keep energy efficiency and safety front and center.