Use Case
Coolroom Panels • Maintenance & Fitout
Essential Guide
Updated: April 2025
Can You Paint Coolroom Panels? Essential Guide (Australia)
Yes—coolroom panels can be painted, but the finish must handle cold temperatures, condensation, cleaning chemicals, and hygiene requirements. This guide covers feasibility, paint systems (primer + topcoat), prep steps, application, maintenance, and DIY vs professional options.
Quick answer: Yes. For best results, use a metal-compatible primer plus a durable topcoat (commonly epoxy or polyurethane systems), keep coats thin and even, and seal edges/joints so moisture can’t creep behind the coating.
If you’ve ever wondered, can you paint coolroom panels—the answer is yes, but it requires careful consideration of panel type, thickness, and surface coating. Below I’ll guide you through feasibility checks, selecting the right paint system, and preparing the surface to achieve a durable, hygienic finish that preserves insulation.
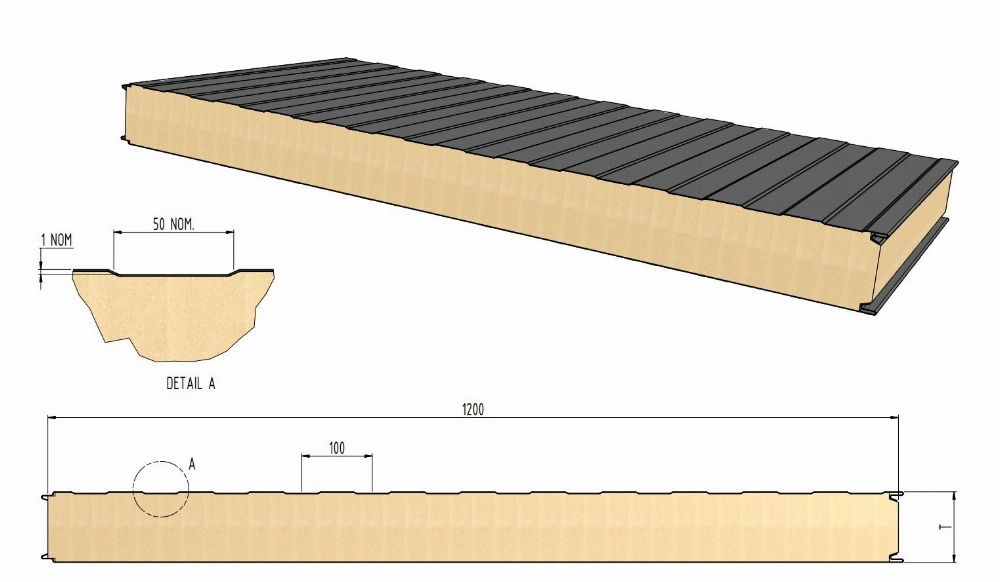
Panel thickness examples
- 25mm (light-duty fitouts)
- 50mm EPS Panel (common coolroom wall thickness)
- 75mm (higher performance / colder applications)
Note: some factory finishes (e.g., Colorbond-like coatings, PVDF, powder coat) may need a specific primer or scuff prep to avoid peeling.
Assessing the Feasibility of Painting Coolroom Panels
Before painting, confirm the panel’s surface type (galvanised steel, aluminium, or coated steel), current coating condition, and whether the panel sits in a food-safe environment. Painting is usually feasible when the surface is clean, stable (no chalking/flaking), and you can apply a compatible primer.
Material composition & surface type
Most insulated coolroom panels are a foam core (EPS/PUR/PIR) sandwiched between metal skins. You typically paint the metal face—not the foam core. Panels from major brands often use factory finishes; you must prep/prime correctly for long-term adhesion.
Thickness & practical considerations
| Panel Thickness | Typical Use | What It Means for Painting |
|---|---|---|
| 25mm | Light refrigeration, small storage | Be gentle with sanding; avoid heat build-up. Focus on clean + correct primer. |
| 35mm | Moderate commercial refrigeration | Standard prep usually works well; prioritize hygiene-friendly topcoat. |
| 50mm | Common coolroom walls | Robust; ensure joints/seals are protected to prevent moisture trapping behind paint. |
| 75mm | Lower temps / higher performance | Do not block drainage/weep paths; avoid painting over critical seal interfaces. |
Hygiene & cleanability
If your coolroom is used for food storage/processing, choose a coating that stays smooth, washable, and resistant to cleaning chemicals. A peeling or porous paint film becomes a hygiene risk fast.
Where painting is NOT recommended
- Panels with widespread delamination, rust under the coating, or chalking that returns immediately after cleaning.
- Panels with heavy condensation issues that haven’t been fixed (painting won’t solve moisture driving behind the film).
- Areas where painting could interfere with door seals, joiners, or locking profiles.
Suitable Paint Types for Coolroom Panels
The best paint for coolroom panels is one designed for metal substrates and a cold / wet environment. In most cases, you’ll get the longest lifespan using a 2-part coating system (primer + topcoat).
Recommended coating systems
- Epoxy (2-pack): Excellent adhesion + chemical resistance for wash-down environments. Great inside coolrooms.
- Polyurethane (2-pack): Strong, abrasion resistant, often better UV stability for external-facing panels.
- Acrylic enamel (selected use): OK for light-duty areas if the environment is not harsh—must be compatible with primer.
Primer matters (don’t skip it)
Even the best topcoat will fail if the primer is wrong. Use a primer that matches the surface: galvanised metal primer for zinc-coated steel, etch primer for aluminium (when required), and always follow the coating manufacturer’s recoat windows.
| Panel Face / Condition | Recommended System | Why It Works |
|---|---|---|
| Galvanised steel (clean, stable) | Galvanised primer + epoxy or polyurethane topcoat | Strong adhesion + moisture and corrosion protection |
| Aluminium face | Surface prep + etch/metal primer + polyurethane/epoxy topcoat | Improves bonding to aluminium and reduces peeling risk |
| Factory-coated (glossy) | Degrease + scuff sand + bonding primer + durable topcoat | Creates “key” for paint to grip |
| Light surface rust spots | Rust treatment + suitable primer + topcoat | Stops rust creep beneath paint film |
Tip: if you’re unsure what coating is on your panel, test a small area first (prep + primer + topcoat) and confirm adhesion before doing the whole room.
Surface Preparation for Best Adhesion
Preparation is the difference between a finish that lasts years and one that peels in weeks. Your goal is to remove contaminants, create a light mechanical “key”, and apply the correct primer.
1) Clean & degrease
- Wash with a mild detergent to remove grime, oils, and food residues.
- Rinse well and allow to dry fully (trapped water causes blistering).
- For stubborn grease: use a metal-safe degreaser, then rinse again.
2) Scuff sand (don’t overdo it)
Lightly sand with fine grit (e.g., ~220) to dull gloss and improve bonding. Avoid aggressive sanding that damages the metal skin or exposes foam at edges.
3) Repair dents & seal joints
Fill dents/scratches with a compatible filler if needed. Check joints for gaps and re-seal with a coolroom-safe sealant. Painting over open gaps can lock moisture in and shorten the coating life.
Preparation checklist
| Step | What to Do | Goal |
|---|---|---|
| Cleaning | Detergent wash + rinse | Remove contaminants that cause paint failure |
| Scuff sanding | Fine grit, even pressure | Create “key” for primer to grip |
| Repairs | Fill/patch, re-seal joints | Prevent moisture ingress and hygiene issues |
| Priming | Correct primer for substrate | Bond layer + corrosion protection |
If you’ve cut panels or exposed edges, prime and seal those edges before topcoating—exposed metal edges are where corrosion often starts.
Step-by-Step: How to Paint Coolroom Panels
Step 1: Plan the job (and protect seals)
Mask door seals, locking profiles, joiners, and any areas where paint could affect fitment. Use drop sheets to protect floors and equipment.
Step 2: Apply primer
Apply a thin, even coat of the correct primer for your panel face. Let it dry per manufacturer instructions. Do not exceed the primer’s “recoat window”—this matters for adhesion.
Step 3: Apply topcoat (two thin coats)
Apply two thin coats rather than one thick coat. Thick coats trap solvents and moisture, which can cause bubbling or soft films. For large rooms, a spray finish often looks best, but rollers can work if you maintain consistent coverage.
Step 4: Cure fully before heavy cleaning
Even if paint feels dry, it may not be fully cured. Allow full cure time before wash-down cleaning or heavy abrasion.
Pro tip: If the coolroom is running, painting is harder. If possible, paint during downtime so the surface temperature is stable and dry.
Common Mistakes (and How to Avoid Them)
Most paint failures come down to: wrong primer, poor prep, or painting in the wrong conditions. Here are the most common issues we see in real coolroom fitouts.
| Mistake | What Happens | Fix / Prevention |
|---|---|---|
| Skipping primer | Peeling, poor adhesion, early failure | Use the correct primer for galvanised steel or aluminium |
| Painting over grease/food residue | Fish-eyes, blistering, delamination | Degrease thoroughly, rinse, fully dry |
| Applying thick coats | Runs, soft film, bubbles | Two thin coats, allow correct flash/dry time |
| Painting in high humidity / wet surface | Blistering, mildew, poor cure | Stabilise temperature, dry surface, ventilate |
| Painting over critical seals/joiners | Door issues, gaps, reduced airtightness | Mask seals and locking profiles carefully |
Maintenance Tips for Painted Coolroom Panels
Regular cleaning (keep it gentle)
Use mild detergents and non-abrasive cloths/sponges. Avoid harsh solvents unless the coating system is rated for them. Regular cleaning prevents bacteria build-up and keeps the surface looking fresh.
Inspect high-traffic zones
Corners, door surrounds, and trolley impact zones wear first. Install corner guards where possible and touch up chips early to prevent corrosion creep.
Quick maintenance checklist
| Action | Why It Matters | Frequency |
|---|---|---|
| Wipe down surfaces | Hygiene + prevents staining | Weekly / as needed |
| Inspect chips/peel points | Stops rust and delamination | Monthly |
| Touch-up small damage | Extends coating life | As needed |
| Check seals/joints | Prevents moisture behind panels | Quarterly |
Impact on Insulation & Hygiene
Does painting reduce insulation?
A properly applied paint system on the metal face usually has minimal impact on insulation. The bigger risk is moisture: poor sealing or painting over wet surfaces can trap moisture behind the film, which can affect hygiene and cause corrosion.
Hygiene after painting
For food environments, choose coatings that cure to a smooth, non-porous, washable surface. Avoid finishes that remain tacky or chalky—these hold dirt and are harder to sanitise.
| Factor | Risk | Best Practice |
|---|---|---|
| Paint type | Peeling / chemical damage | Use epoxy/polyurethane systems designed for wash-down areas |
| Paint thickness | Blistering / soft film | Thin coats + correct flash times |
| Surface moisture | Mould / corrosion under film | Dry completely; fix condensation sources first |
| Edges & joints | Moisture ingress | Seal, prime exposed metal edges, maintain joints |
Professional vs DIY Painting for Coolroom Panels
DIY painting can work for small rooms or cosmetic refresh jobs, but professional application is usually worth it for large commercial coolrooms—especially where hygiene standards and wash-down durability matter.
| Aspect | Professional | DIY |
|---|---|---|
| Coating system selection | Correct primer/topcoat for substrate + environment | Often trial-and-error unless you follow datasheets closely |
| Finish quality | More even finish, fewer runs, better corners/edges | Good on small areas; harder on large walls/ceilings |
| Time & downtime | Faster completion for large rooms | Longer; cure times may delay re-use |
| Risk management | Lower risk of peeling/hygiene issues | Higher risk if prep/primer is wrong |
FAQs
Can I paint inside a working coolroom?
It’s possible, but not ideal. Stable temperatures and a dry surface improve curing and adhesion. If you can, paint during downtime and allow full cure before wash-down cleaning.
Do I need to sand coolroom panels before painting?
Usually yes—light scuff sanding helps primer bond to glossy factory finishes. Avoid aggressive sanding that damages the metal skin or exposes foam edges.
What paint is best for a hygienic, washable finish?
A 2-pack epoxy system is commonly used in wash-down areas for chemical resistance and easy cleaning. A polyurethane topcoat is often preferred where UV or abrasion resistance is important.
Will painting void my panel warranty?
Some manufacturers specify coatings and prep requirements. If you’re unsure, test a small section and check the supplier’s guidance before painting the entire room.