Use Case
Are you ready to build cold room panels that keep your space perfectly chilled? Whether you’re setting up a walk-in cooler for your café or a freezer for your warehouse, crafting your own insulated panels can save you money and give you total control over your cold storage design. As a DIY enthusiast or small business owner, I’ve learned that mastering cold room panel construction is all about the right materials, tools, and know-how—straight from the pros at Cool Room Master.
In this guide, you’ll uncover step-by-step instructions, expert tips, and the best insulation materials to create energy-efficient panels that rival pre-made ones. From polyurethane foam to air-tight sealing, we’ve got you covered with practical advice that works.
Let’s dive in and start building your cold storage solution today!
Understanding Cold Room Panels What They Are Used For
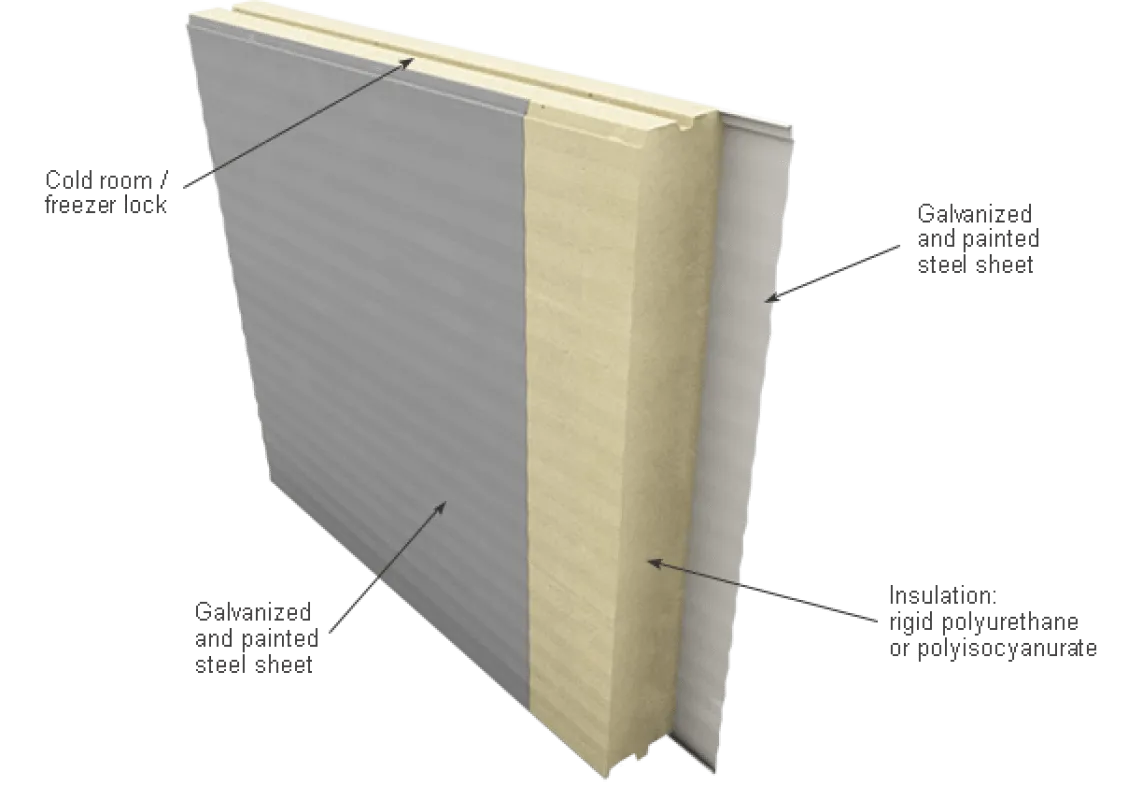
Cold room panels are specially designed insulated panels used to build cold storage rooms, walk-in freezers, and commercial refrigeration units. These panels consist of an insulating core, usually made from materials like polyurethane foam, sandwiched between durable cladding materials such as aluminum or steel. The combination of insulation and a sealed outer surface helps maintain a controlled low temperature inside the cold room.
Cold room panels are essential for preserving perishable goods such as food, pharmaceuticals, and temperature-sensitive products. They provide energy-efficient insulation that keeps the cold air inside while blocking warm air and moisture from entering. These panels are used in commercial settings like restaurants, supermarkets, warehouses, and food processing plants, as well as in smaller applications like home-based refrigeration or DIY cold storage solutions.
In , cold room panels form the structural and insulating walls, ceiling, and floors of temperature-controlled spaces, enabling reliable and efficient cold storage across various industries.
Benefits of DIY Cold Room Panels Cost Savings Customization Learning Opportunity
Making your own cold room panels comes with some real perks, especially if you’re in the U.S. and want to keep costs down. First off, cost savings is a big deal. Buying pre-made insulated panels or commercial refrigeration panels can get pricey fast. When you DIY, you control where every dollar goes—materials, insulation, and finishes—so you avoid paying extra for factory overhead or shipping.
Next, customization is a huge plus. Off-the-shelf cold room panels might not fit your exact size or layout, which can lead to wasted space or inefficient cooling. Building your own means you can design panels to fit your dimensions perfectly, whether it’s for a walk-in cooler, freezer, or special storage needs. You can also pick the best materials, like polyurethane foam panels or sandwich panels, to boost your cold room insulation and energy efficiency based on local climate and usage.
Finally, the process is a great learning opportunity. You get hands-on experience with insulated panel construction, see how different insulation materials perform, and understand cold room design tips that work in real life—skills that come in handy for future projects or maintenance. Plus, it gives you flexibility to make quick repairs or upgrades without waiting for parts or professionals.
Overall, DIY cold room panels offer savings, tailored solutions, and a solid chance to build your know-how in cold storage setup.
Materials and Tools Needed for DIY Cold Room Panels
Essential Materials Insulating Core Cladding Materials Sealants Adhesives Fasteners
To build effective DIY cold room panels, you need the right materials that provide good cold room insulation and durability. Here’s what you’ll need:
Insulating Core
- Polyurethane foam panels or polystyrene foam: These are the most common insulating cores. They offer excellent thermal resistance and help keep the cold in.
- Thickness typically ranges from 25mm to 75mm depending on your cooling needs.
Cladding Materials
- Aluminum sheets or galvanized steel panels: These cover the insulation core and protect it from damage and moisture. They’re lightweight, durable, and easy to clean.
- Often called sandwich panels, they’re available in various sizes and thicknesses—choose what fits your project.
Sealants and Adhesives
- High-quality silicone or polyurethane sealants: Essential to seal the joints between panels and prevent air leaks.
- Foam-compatible construction adhesive: Used to bond the insulation core to cladding securely.
Fasteners
- Self-tapping screws or cam lock fasteners: These hold panels together firmly, especially at corners and edges.
- Make sure they are corrosion-resistant since cold rooms can have high humidity.
Having these materials ready will ensure your cold room panels provide energy-efficient cold storage, lasting well and delivering the insulation performance you need.
Materials and Tools Needed for DIY Cold Room Panels Tools Required Cutting Measuring Safety Assembly
To build effective DIY cold room panels, you’ll need the right tools to make cutting, measuring, and assembling easier and safer. Here’s a quick rundown:
Cutting Tools
- Circular saw or panel saw for clean, straight cuts on cladding and insulation materials
- Utility knife or hot wire cutter for trimming foam insulation like polyurethane or EPS panels
- Jigsaw for cutting out openings or curves if needed
Measuring Tools
- Tape measure for accurate dimensions
- Carpenter’s square to keep edges straight and corners square
- Pencil or marker for marking cut lines clearly
Safety Equipment
- Safety glasses to protect eyes from dust and debris
- Work gloves to avoid splinters and sharp edges
- Dust mask or respirator when cutting insulation to protect lungs
Assembly Tools
- Power drill and screwdriver for fastening panels with screws or cam locks
- Caulking gun for applying sealants and adhesives evenly
- Clamps to hold panels in place while adhesive cures
Having these tools ready ensures precision during panel construction and helps keep the process safe and efficient. Before starting, it’s a good idea to check if any specialized tools are required for the particular materials you choose, like sandwich panels or polyurethane foam panels, which are common in energy-efficient cold storage build-outs.
For more on cutting techniques and tools, you can see a detailed guide on how to cut coolroom panels like a pro.
Step 1 Plan and Design Your Panels Measure Determine Insulation Check Regulations

The first step to making your own cold room panels is all about planning and design. Start by measuring the space where you want to install the cold room. Accurate measurements ensure the panels fit perfectly for better insulation and energy efficiency.
Next, decide on the type and thickness of insulation you need. Popular options for cold room insulation include polyurethane foam panels or expanded polystyrene. The thickness usually ranges from 25mm to 75mm depending on your cold storage needs. Thicker panels offer better temperature control but cost more.
Before moving forward, check local building codes and refrigeration regulations. Some states require specific insulation standards or certifications for commercial refrigeration panels. Making sure your DIY cold storage panels meet these rules upfront saves headaches later.
In this planning stage, consider:
- The cold room’s purpose (food storage, medical, etc.)
- Expected temperature ranges and humidity
- Panel sizes and modularity for easier installation
- Access points like doors and wiring for control systems
Planning smart from the start will make building insulated panel construction easier and ensure your cold room stays energy-efficient and durable.
Step 2 Prepare Materials and Workspace Cut Materials Setup Workspace
Now that you’ve planned your cold room panels, it’s time to get your materials ready and set up your workspace. Start by gathering all your insulating core materials like polyurethane foam panels, cladding sheets (aluminum or steel), sealants, adhesives, and fasteners. Make sure everything matches your measurements from Step 1.
Next, set up a clean, flat workspace with enough room to lay out and cut the panels safely. Use a sturdy workbench or large table where you have easy access to tools like a saw, utility knife, measuring tape, and straight edge. Clear the area of dust and debris to keep insulation clean and avoid damage.
Cut your insulating core and cladding materials accurately to size, following your measurements exactly. Use sharp blades designed for the materials to get clean cuts and reduce waste. For thicker panels, a circular saw with a fine-toothed blade works best to handle 50mm or thicker polyurethane foam insulation.
Keep safety gear on—gloves, eye protection, and a mask—especially when cutting foam or metal sheets. Having everything pre-cut and ready makes assembly faster and more precise. Organize your materials nearby to streamline the next steps in panel building.
Step 3 Assemble the Panel Core Layer Insulation Use Adhesives
Once your materials are cut and ready, it’s time to put the cold room panels together. Start by laying down the insulating core—this is usually polyurethane foam or EPS foam, which provides excellent cold room insulation. Make sure the insulation fits snugly within the panel frame without gaps or compression, as this will impact energy efficiency.
Next, apply the right adhesive evenly on both the insulation and the cladding material (usually metal or aluminum sheets). Use a contact adhesive or a strong construction adhesive specifically designed for insulated panel construction to ensure a secure bond. Press the two layers firmly together, making sure everything lines up properly.
Work on one panel at a time, and avoid rushing to maintain precision. You can find helpful tips on adhesive application and panel construction in our guide on how to cut coolroom panels like a pro. Proper assembly here means your DIY cold room panels will be durable, energy-efficient, and ready to stay sealed against temperature changes.
Step 4 Seal and Secure the Panels Apply Sealants Add Supports
Once your cold room panels are assembled, sealing and securing them properly is key to keeping the insulation effective and preventing cold air leaks. Start by applying a high-quality sealant around all the edges and joints. This helps block moisture and air from getting in, which could reduce your cold room’s efficiency. For the best results, use a foam or silicone sealant designed for cold storage or insulated panel construction.
Next, add supports to keep the panels rigid and stable. This usually means installing metal or wood braces along the panel edges and corners. Supports help maintain the panel shape over time, especially under pressure from temperature changes or heavy use. Proper fastening with screws or cam locks ensures the panels stay tightly connected and aligned.
Remember, well-sealed and supported panels not only improve your cold room’s energy efficiency but also extend its lifespan. Don’t rush this step—take your time to check for any gaps or weak spots before moving on to the installation phase.
Step 5 Test and Install Check for Gaps Install Panels
After assembling and sealing your DIY cold room panels, it’s time to test and install them. Start by inspecting each panel closely for gaps or spots where insulation might be compromised. Even small gaps can lead to energy loss and reduce the efficiency of your cold storage. Use foam sealant or weatherstripping to fill any gaps you find.
When everything looks sealed tight, begin installing the panels in your designated space. Make sure each panel fits snugly and aligns properly with the next. Secure them firmly using the right fasteners or cam locks designed for insulated panel construction. Proper installation ensures your walk-in cooler panels provide consistent cold room insulation, keeping temperatures stable and your stored items safe.
Once installed, double-check the entire cold room for air leaks around doors, corners, and wiring entries. A quick test with an infrared thermometer or thermal camera can help spot hidden cold spots. Fix any issues right away to maintain energy-efficient cold storage.
This final step is crucial for making sure your DIY cold storage panels perform as well as commercial refrigeration panels you’d find from manufacturers across the U.S. Proper testing and installation translate into better durability and compliance with cold room design tips and building codes.
Tips for Success Ensure Quality and Efficiency Choose Quality Insulation Precision Consider Professional Consultation Maintain Panels
To make sure your cold room panels work well and last, focus on these key tips:
- Choose Quality Insulation: Use reliable insulation materials like polyurethane foam panels. Good insulation keeps your cold room energy-efficient and prevents heat leaks.
- Be Precise: Measure twice, cut once. Precise cuts and tight joints reduce gaps that can cause air leaks and reduce cooling efficiency.
- Seal Properly: Use the right sealants and adhesives to secure panel edges and joints. Proper sealing helps maintain consistent cold room temperatures.
- Consider Professional Help: If you’re unsure about local building codes or commercial refrigeration panel standards, a professional consultation can save time and avoid costly mistakes.
- Maintain Regularly: Inspect panels and seals regularly. Fix any damage or wear quickly to keep your cold storage running smoothly and efficiently.
Following these tips will help you build cold room panels that stand the test of time while keeping your storage space well insulated.
DIY vs Buying Pre-Made Panels Which Is Right for You
When deciding between DIY cold room panels and buying pre-made panels, it’s important to weigh your needs against the pros and cons of each option.
Cost
- DIY panels can save you money on materials and labor if you’re comfortable with the process.
- Pre-made panels often come with a higher upfront cost, but they include quality assurance and precise manufacturing.
Time and Effort
- Making your own panels takes more time and effort. You’ll need to plan, measure, cut, assemble, and seal everything yourself.
- Pre-made panels arrive ready to install, saving you a lot of time and hassle, which is great if you need your cold room up quickly.
Quality and Performance
- Pre-made cold room panels from reputable suppliers use tested materials like polyurethane foam and come with strong seals and fittings, which means better energy efficiency and durability.
- DIY panels are customizable but depend entirely on your skill and materials used. Mistakes can lead to poor insulation or air leaks.
When to Choose Pre-Made Panels
- You want a fast, reliable setup with guaranteed insulation standards.
- You’re building a commercial walk-in cooler or freezer with strict health or safety codes.
When to Choose DIY Panels
- You want to save money and have some experience with construction or handy work.
- You need custom sizes or specific insulation thicknesses that are hard to find pre-made.
Call to Action
If you’re unsure, consider talking to local cold room panel manufacturers or suppliers near you. They can offer advice, show product options, and help you find the best fit for your project and budget.
Common Mistakes to Avoid Using Low Quality Materials Ignoring Codes Poor Sealing
When making cold room panels, using cheap or low-quality materials can really hurt your project. Poor insulation or weak cladding materials reduce efficiency and can lead to faster wear and damage. Always pick reliable, energy-efficient materials like polyurethane foam panels designed for cold storage to keep your room well insulated and durable.
Ignoring local building codes and refrigeration regulations is another big mistake. Cold room panels have to meet specific standards for safety and performance. Skipping this step can lead to costly fines, failed inspections, and even unsafe conditions in your cold storage.
Poor sealing is one of the most common issues. Gaps or weak seals allow cold air to escape, pushing your cooling system to work harder and raising energy costs. Use proper sealants and double-check joints to make sure your panels are airtight. This keeps your cold room energy-efficient and maintains consistent temperature control.
In short, focus on quality materials, follow regulations, and seal everything properly to avoid common pitfalls and make your DIY cold room panels work as they should.
FAQs About Making Cold Room Panels
What is the best insulation material for cold room panels?
Polyurethane foam (PU) and expanded polystyrene (EPS) are the most popular insulation cores. PU offers better thermal resistance, while EPS is more budget-friendly. Both are energy-efficient for cold storage, but choosing depends on your budget and cold room needs.
How much time does it take to make cold room panels?
Making DIY cold room panels typically takes a few days. Planning and preparation might take a day, cutting and assembling another, and sealing plus testing on the last day. It depends on the size of your project and your experience.
Can I build a small cooler using DIY cold room panels?
Yes, DIY panels work great for small walk-in coolers. They provide good insulation and can be customized in size. Remember to use the right thickness, usually 50mm or more, to keep your cooler energy-efficient and maintain temperature.
How durable are DIY cold room panels?
Panels made from quality materials like PU or EPS cores with strong cladding (like aluminum or steel) are durable and long-lasting. Proper sealing and maintenance will add years to their lifespan.
Do DIY cold room panels meet local building codes and compliance?
You must check your local regulations before building. Some areas have specific codes for insulation thickness, fire safety, and materials. For detailed guidance, you can visit resources like Do EPS Panels Meet Australian Building Codes, which offer insight into compliance that might parallel U.S. standards.
If you want confidence in your build, consider consulting a professional during planning or before installation.
For supplies, check out the Cool Room Master shop for quality materials and panels designed to meet industry standards.